Friday, April 30, 2010
Clouds for Computers - What Two Very Different California Communities Have in Common

Thursday, April 29, 2010
Come Draft with Us - Sustainable Bicycle Gifts
| Along with pleasant spring skies and sunny days perfect for biking season comes a plethora of Bike-Inspired Design – everything from bicycle gear clocks to rehabbed furniture made from bikes, this has got me rearing to get my own butt in gear! |
![]() |
| Make space instantly! I found these very practical and minimally designed ceiling hoists for your bike – perfect for small spaces that require the edgy charm of a bicycle. Simply mount to the ceiling, hook on both ends of bike and with each pull it clicks to lock. Best part: they’re supremely affordable and sell for around $15. Some homes boast fancy light fixtures, why not exhibit your Trek? Available at Amazon.com. |
![]() |
| Waking up to the tick tock of a bicycle clock may just help you get out of bed to hit the trails! Made from recycled gear parts and chains, this sets up a playful yet functional conversation piece. Besides being made from sustainable recycled materials, even the non-biker would appreciate its cool design. Available at BrightandBold.com. |
| Hip vintage bicycle art is a fantastic way to brighten any space. This wall art is available in several different sizes, on a green or white background. Features both canvas and framed art, printed with eco-friendly inks and mounted on sustainable wood. Framed art starts at just $55. Available at ModernMural.com. |
![]() |
| Designer Andy Gregg produces bar stools, chairs and more are made from recycled bicycle parts; side tables use glass from auto windows all to create modern furniture. Gregg was influenced from his years biking and does nothing less than impress. All host beautiful arcs from bicycle wheels, some bent gently to create fluid design. Donated materials from old bikes will warrant a discount on a purchase. If you like the look of aluminum, steel and rubber here’s the place to go for something truly one of a kind. Available at BikeFurniture.com. |
Monday, April 19, 2010
Modern Mural's Genesis
I am asked this question quite frequently, and I just wanted to tell our story.
Thursday, April 1, 2010
Customizing Your Wall Décor
Whether you’re partial to contemporary abstract art or your own personal pictures, Modern Mural can help you create stunning wall murals that fit your needs and your décor.How does this work?
It’s easy! Check out the new “Design Your Own!” tool on the Modern Mural web site and follow the steps below to create your personalized or abstract wall art.
- Once on the “Design Your Own!” page, choose a layout for your art. After selection, the layout may be changed at any time by clicking the browse button located above the picture preview. There is no risk for low resolution, as the site will not allow you to continue if the resolution of the photo is too low to print on the chosen layout.
- Choose a design. There are three options: a) You can choose one of the many Modern Mural designs. All of the Modern Mural Art Collections are located on the left-hand side of the screen for you to browse through. b) You can upload your own high-resolution photo. To upload your own photo, click on the “My Art” tab and choose “Upload My Art!” You will then have the opportunity to browse your computer for the photo you wish to use. Keep in mind that high-resolution photos, for example, photos from an 8-megapixel camera, work best for this option. c) You can purchase images from other sites that may be uploaded and used to create a modern mural. Size requirements for these images are XL, XXL, or vector. Some examples of these web sites include: stockxpert.com, istockphoto.com, and fotolia.com
- Click on the thumbnail picture of your choice.
- Adjust the design. Your picture will appear in the large preview box in the center of the screen. At this point, you can use your mouse to drag the picture into the position you desire or use the Zoom Art and Visibility slider bars, located beneath the preview, to change the look. “Reset Art Layout” will return the picture to its original position.
- When you are satisfied with the design, click “Add to Cart” and you will be able to see a final preview of your art. Click “Add to Cart” again to place the order into your shopping cart, then “My Cart” at the top of the page to check out.
Congratulations! You have created your own customized wall décor. Your personalization, along with the superior quality of these wall prints, makes the artwork the ideal fusion for your stylish and smart lifestyle.
By guest writer, Sandy Randazzo, owner of www.youhavemywords.com
Thursday, March 11, 2010
An Ode to Wine

Wednesday, March 3, 2010
Photons, waves and psychology, oh my! Color and your mural.

Color is complicated, there's no doubt about it. We all studied color and light waves in grade school. Color can change in virtually every situation, and what may look red at night may look magenta in the morning hours. Your upbringing and the country you were born in may influence your ability to see different colors.
Monday, February 8, 2010
Wall Art - a Smash Hit

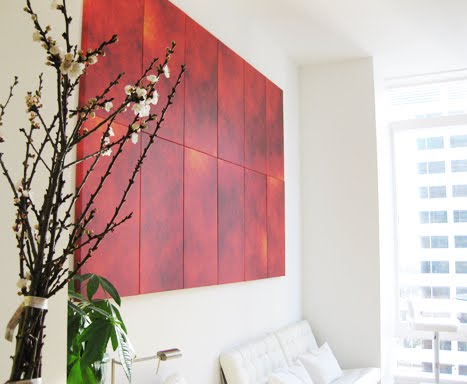
Here is a photo of the finished product (plus four more panels) hanging in the client's home which I wrote about in the previous post. The finished product measures 9 feet wide and over 5.5 feet tall. This is an interesting twist: the client chose to hang all the panels next to each other with out spacing, and it looks great! Note: this was a custom design and cannot be ordered on the website, but call us for details. All of the products on the website are made so that the panels hang 2-3 inches from one another.
Monday, February 1, 2010
New Office Dog!
Monday, January 25, 2010
Huge mural for modern loft apartment!


Monday, November 23, 2009
Hanging Contemporary Wall Art in Large Spaces

Monday, November 9, 2009
How to Hang Oversized Wall Art
Hanging large wall art (more specifically hanging multiple panels of artwork) shouldn’t be the cause of your waking nightmares. I, too, have had the disappointing visual of sporadic pencil marks and nail holes peeking from around the artwork I just hung up. We can conquer! And it’s really easy. So here we go…
1. Make a pattern/template from a paper painter’s drop cloth (make sure it’s paper – less than $5) found at Home Depot or other hardware store.
2. Spread the paper open on the floor and arrange the panels as you’d like them to hang on the wall. For the wall art arrangements we sell, each row will be hung at the same height. Use a ruler or tape measure to make certain that they are aligned correctly. I find it best to first arrange panels on a large table or floor as you’d like them to hang on the wall. Measure the same height for all panels both horizontally and vertically with the necessary spacing. We recommend a 2-3 inch space between all panels. This allows for easy viewing. (Note that the panels we sell are packaged in order with #1 on the top and in the same orientation for convenience. Sometimes it’s hard to tell which way is up with abstract art.)
3. Once you have the wall art laid out and measured, trace the outside of the frame. With the canvas prints, it’s better to make small marks around the 90 degree corners of the frame as to not mark the canvas. Make a mark with your pencil within the tracing where the nail will be placed once the frame is hung.
4. Remove the frames from the paper. Pin or tape the paper sheet to the wall, ensuring that both ends of the paper are hung at the same height. Hammer the nails into the marks for the nail holes directly through the paper. Tear down the paper, or save for later. Once it’s removed, you are left with glorious aligned nail holes! Hang up the wall art.
See? No sweat. Now it’s time for 30 Rock!
Next: Hanging contemporary wall art in large spaces. How high/low do I go?


.jpg)